_inmm.dll is a suite of tools that can fix CD audio playback problems in several older games. A common problem with CD audio in older games is that it does not loop correctly, meaning the background tune plays once and then stops, leaving the game with just the sound effects. In many cases _inmm.dll can solve this problem, restoring proper sound playback to the game. While the tool cannot fix every game, it is useful in many cases and is always worth a try if your game uses CD audio.
Downloading _inmm.dll
Your first challenge is to download the program successfully. _inmm.dll is developed by a Japanese author, meaning all official documentation for the program is in Japanese. The program itself however is in English. Fortunately for you, we have it hosted right here at cd-2-dvd.com
Once downloaded, copy the _inmm238 executable file from the zip folder to any convenient location on your PC and then run it. This will install the program. Installation is really easy so we won’t walk you through that.
Now that you have _inmm.dll installed, using it is a three-step process. Step one is to convert the CD audio from your game into mp3 format. Step two is to patch the games executable to use _inmm.dll and step three is to create an inmm.ini file. Each step is pretty easy and we’ll walk you through it, so don’t worry.
Step 1 – Extracting CD audio
_inmm.dll requires you to convert your games CD audio soundtrack into mp3 format. Other formats may work too but we’ve found mp3 to be the most reliable. Theoretically this does mean a slight reduction in the quality of your games audio, though you’d need a very keen ear and a very high quality sound system to notice. You can use any program you like to extract the audio as long as you make sure that you use MP3 format. Windows Media Player can extract CD audio to MP3, for example. Extracting CD audio for use in _inmm.dll is exactly the same as it is when using ScummVM, so follow this tutorial if you’re unfamiliar with this process.
Once you have your games audio files extracted, place them in a sensible location. A sub-folder named “music” within your games installation folder would be ideal, for instance.
Step 2 – Patching
There are several ways to complete this step, but the easiest is to simply drag and drop the file you want to patch. First of all, browse to your games installation folder and locate the executable file. Typically this is the file that is used to start the game, though not always. Some games have a launcher program that lets you adjust various game settings etc before you play. You must patch the actual game file and not the launcher. A little bit of trial and error might be needed here. Remember you can identify executable files by the .exe file extension at the end of their file names. If you can’t see this, you may have file extensions hidden for known file types. See this tutorial for more information on this setting and how to disable it.
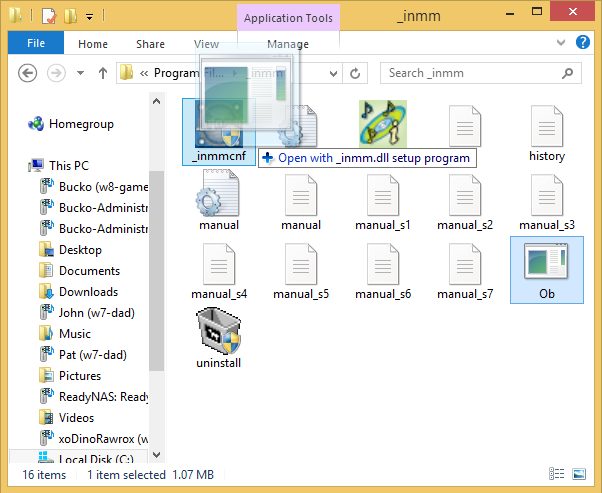
Once you have located the correct executable file, right click on it and choose “Copy”. Now, browse to the _inmm.dll program folder (C:\Program Files\_inmm by default) and paste the games executable in here. You may see a Windows User Account Control window appear when you do this, but it is safe to grant permission. Now, simply drag and drop the executable file you want to patch over onto the _inmmcnf executable. The picture below shows an example. Click on the picture to see a bigger version.
Once you drop the executable onto the _inmm.dll program, a UAC window will appear again. Click on “Yes”. Your executable is now patched for use with _inmm.dll. A backup copy of the file is also created, and is given the .org file extension. If you need to undo the patching process simply delete your newly patched executable and rename the .org file to .exe.
Now that you have the patched executable, move (cut) this file and the .org backup into your games executable folder, overwriting the existing .exe file. Don’t start your game just yet though, you still need to create a _inmm.ini file.
Step 3 – Creating an _inmm.ini file
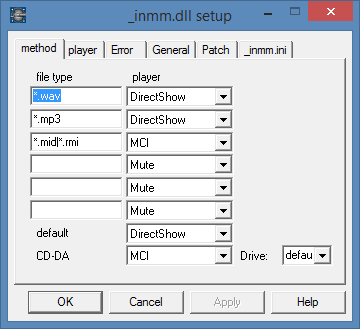
The _inmm.ini file tells the computer where to look for your music files while playing the game. Creating one is pretty straightforward. Firstly, run the _inmm.dll Setup program from the Start menu or Start screen. Now, make sure the “Method” tab is selected and change “default” to “Directshow” as per the picture below.
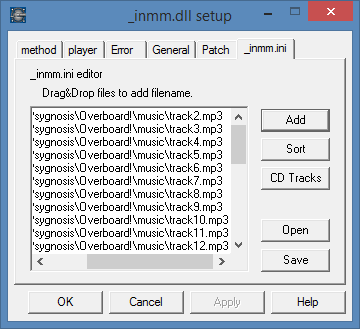
Now, click on the “_inmm.ini tab. This is the tab where you select the files you want the game to play. All you need to do is click on “Add” and browse to the folder where you stored the music you ripped in the first step. Now, select all the MP3 files (hint, click on the first file, then scroll to the bottom and hold down shift while you click on the last file, this will select them all in one go) and select “Open”. If you completed this correctly, the window should look similar to the one shown below.
You now need to save the _inmm.ini file. You must save this file to your games directory, NOT to the _inmm directory and NOT to the directory where you stored the extracted CD audio files. Click on the “Save” button, browse to your games installation folder and save the _inmm file in the same folder as the games executable file.
Now you can test your game. Load the game and start a new game, if the game doesn’t crash and the music loops correctly then congratulations, you successfully patched your game to use MP3 files and cured the CD audio looping bug. If you have problems or the patch was simply unsucessful, you can always revert back to the unpatched executable by deleting your games executable file and renaming the backup file from game.org to game.exe.
Acknowledgements
This guide is based on the guide published here, which covers how to fix CD audio looping problems in the game “Quake”.
Source: Play Old PC Games
Download “_inmm.dll (Audio old Games)” _inmm_2_3_8_cd2dvd.zip – Downloaded 576 times – 288 KB


